
Part II: In-App Payments on Microsoft Store
In this part of the blog I am going through all the steps required to add in-app billing to your Air app on the Microsoft Store. Please start with the first part of the blog if you haven’t read it, yet.
The key component for this part is an Adobe Native Extension (ANE) that supports the Microsoft Store API for in-app purchases. For our games we are using an ANE that the Distriqt team has developed for us. This ANE is available here: https://airnativeextensions.com/extension/com.distriqt.WindowsStore
Foreword
Before we start: I have implemented roughly a dozen different payment services into our games. The API for the Microsoft Store was by far the worst. You can consider yourself lucky if you only care about client-side payments, but if you require server-side verification, things will get dirty. You have been warned.
ANE Project Setup
In your application.xml, add the extensionIDs for the Store payment ANE.
<extensions>
    <extensionID>com.distriqt.WindowsStore</extensionID>
    <extensionID>com.distriqt.Core</extensionID>
</extensions>
Maybe you remember our adt command from Part I:
adt -package -storetype pkcs12 -keystore “cert\desktop.p12” -storepass [PASSWORD] -target bundle air\install.air application.xml -C bin . -extdir “..\_extensions”
In our case, this means we are going to put the native extension files (*.ane) into a directory called _extensions that is one level higher than the application.xml. At the same time, create a directory called _extensionsUnpacked that you place next to the _extensions folder. In this folder, create directories for each ANE that you name like the ane file itself, but with an “Unpacked.” just before the “ane” extension (see example below).
ANE files are just zip folders. Copy each ane into a temporary location, change the filename to zip and unzip each into the respective “Unpacked” directory you created. You should end with a structure like this one:
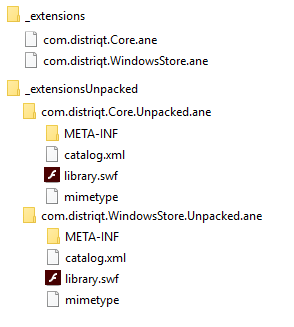
The Unpacked directory is required when debugging Air software locally on Windows, since adt likes to work with the unzipped directories instead of the ANE files.
While we are at it, the Distriqt ANE comes with a set of Windows *.dll files that are required for the final .exe to run. Create a directory _windowsStoreDll next to the _extensions and _extensionsUnpacked folders and copy all 5 *.dll files there.
I am using FlashDevelop and added a line in the bat scripts to copy these files into the build folder after the exe has been created. Use something like this:
robocopy ../_windowsStoreDll air/install.air
If you are not using FlashDevelop, you just need to make sure that you copy the *.dll files next to your *.exe after the adt command from above was executed.
Store Preparation
Browse to the Windows Dev Center and log into the dashboard to add at least one in-app item for your app that you can use to test purchases. The Windows Dashboard calls them add-ons, but they have support for persistent and consumable items, just like you would expect.
Once you created your item in the dashboard, click that item and find a Store ID below the name. You will need to use this Store ID in order to tell the API which item you want to buy.
If I remember correctly, you will need to submit your app and your add-on to Microsoft in order to make test calls to the API, but feel free to correct me if I’m wrong. At least if you are interested in server-side verification.
Now that you have an item ready, lets have a brief look at the implementation:
public override function initNativePayment() : void
{
	_debug = new TextField();
	_debug.visible = false;
	_debug.width = 400;
	_debug.height = 400;
	_debug.background = true;

	_stage.addChild(_debug);

	if (WindowsStore.isSupported && !_paymentsInitialized)
	{
		_paymentsInitialized = true;
		WindowsStore.service.setup();

		WindowsStore.service.addEventListener(PurchaseEvent.MAKE_PURCHASE_COMPLETE, makePurchaseCompleteHandler);
		WindowsStore.service.addEventListener(PurchaseEvent.MAKE_PURCHASE_ERROR, makePurchaseErrorHandler);
		WindowsStore.service.addEventListener(PurchaseEvent.GET_PURCHASES_COMPLETE, inventoryCompleteHandler);
		WindowsStore.service.addEventListener(PurchaseEvent.GET_PURCHASES_ERROR, inventoryErrorHandler);
		WindowsStore.service.addEventListener(ProductEvent.GET_PRODUCTS_COMPLETE, getProductsCompleteHandler);
		WindowsStore.service.addEventListener(ProductEvent.GET_PRODUCTS_ERROR, getProductsErrorHandler);
		WindowsStore.service.addEventListener(StoreIDEvent.GET_STOREID_COMPLETE, storeIdCompleteHandler);
		WindowsStore.service.addEventListener(StoreIDEvent.GET_STOREID_ERROR, storeIdErrorHandler);

		//error logging
		WindowsStore.service.addEventListener( "log", logHandler);
		WindowsStore.service.addEventListener( ErrorEvent.ERROR, errorHandler);
	}
}
You can see we are going to use a TextField called _debug that can display some debugging information after the app is live. In order to get this past the Microsoft quality control team, make sure the TextField is invisible and only opens when entering a secret code or pressing a special key. This will be a great help to debug the Store payments later if something goes wrong.
In order to access the information of items in your app and display them to the user, start by loading the products that you are interested in:
var items : Array = ["Store ID from before"];
WindowsStore.service.getProducts( items );
This will trigger a ProductEvent.GET_PRODUCTS_COMPLETE that will contain Store information about the items you requested, like name, localized price, etc.
To start the purchase for an item, call this code:
var request:PurchaseRequest = new PurchaseRequest();
request.setProductId("Store ID from before");
WindowsStore.service.makePurchase( request );
This should respond with a PurchaseEvent.MAKE_PURCHASE_COMPLETE or PurchaseEvent.MAKE_PURCHASE_ERROR depending if the user completed the purchase.
In the event handler makePurchaseCompleteHandler you can now consider the purchase successful and either give the item to the user right away or start a server side verification.
If you work on a client-only app, the work-through ends here for you. Congrats on implementing Microsoft Store payments!
Please note: The API calls to Microsoft Store will only function correctly after your Air app has been packaged to an .appx Store Application, not when debugging locally or running the .exe file. Keep this in mind before you start testing your code. Follow the instructions in Part I to package your app.
Server-side verification: Where the trouble starts
Okay we have made it through the client side purchase. To verify the purchase on your server and issue the item on your database or just give a green light to your client to prevent cheating, you will need a (free) Microsoft Azure account.
For some reason I have a hard time finding the proper link to the Azure Dasboard from all the Azure Marketing material. Once you have registered, find the Azure Portal here: portal.azure.com
Azure Active Directory
In order to allow your servers to access information from the Microsoft Store for your users, you will need to setup an Azure Active Directory for your apps. In the Azure Portal, click Azure Active Directory on the left side.
From there, navigate to App Registrations and create a new web app for your server. Follow this guide for step 1 and step 2: https://docs.microsoft.com/en-us/windows/uwp/monetize/view-and-grant-products-from-a-service
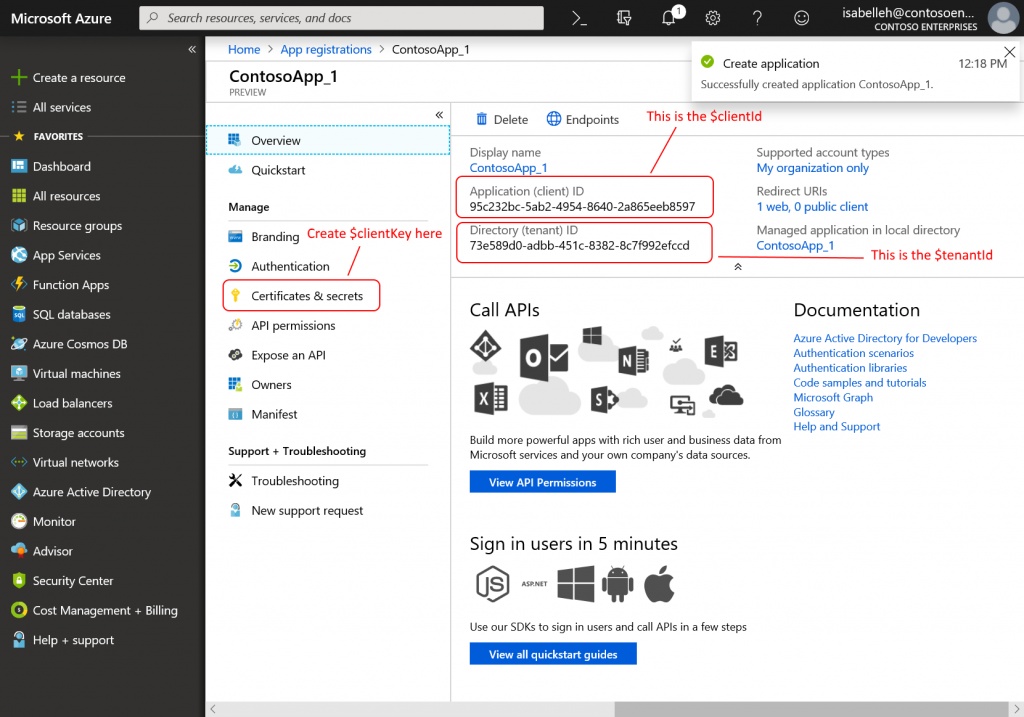
The calls to the Microsoft servers will require a valid token for the application that you have created. Navigate to the application in Azure Active Directory that you have created and find Certificates & Secrets on the left side. Go there and add a new client secret key that will be valid forever. Copy that key and the application ID to create the server side code that generates your token like so:
$url = "https://login.microsoftonline.com/$tenantId/oauth2/token";

$data = array(
	'grant_type' => 'client_credentials',
	'client_id' => $clientId,
	'client_secret' => $clientKey,
	'resource' => 'https://onestore.microsoft.com'
);

$fields = http_build_query($data);

$post = curl_init();

curl_setopt($post, CURLOPT_URL, $url);
curl_setopt($post, CURLOPT_POST, count($data));
curl_setopt($post, CURLOPT_POSTFIELDS, $fields);
curl_setopt($post, CURLOPT_RETURNTRANSFER, 1);
curl_setopt($post, CURLOPT_TIMEOUT, 5);

$raw = curl_exec($post);

curl_close($post);

$response = json_decode($raw, true);

$token = $response['access_token'];
$expires = $response['expires_in'];
Now if you are wondering what the $tenantId is and where to find it, that is a valid question. If you use any language other than english in the dashboard, you are lost in translation and you can just start guessing around. Fortunately I wasted my time on this so you don’t have to. It’s the ID just below the application (client) ID on the overview of the application you have registered in the Azure Active Directory.
Connect Store App with Azure App
Before Azure can query information for your app on behalf of your server, you will need to grant the Azure application we created for your server access to your Microsoft Store application. Once more navigate to the Windows Dev Center and to the dashboard in your browser. Go to Products, click your app, go to Services and select Product collections and purchases. Here, paste the application ID from your Azure App registrations, the same one we used before on the server side code to create the token. Then save the page. This will grant the access for your servers through Azure.
Query and fulfil purchases for users
Okay, almost there. Now whenever your users complete a purchase in the client, you will want to tell your server to verify and fulfill this purchase. Unfortunately, Microsoft decided to not tell your client anything about this purchase that could be used to verify it on the server, not even a transactionID or receipt.
Instead, you will have to query the Windows Store API on your client to receive the “collections ID” of the user. It’s sort of a user ID. But it’s not really a user ID. It only lasts for 90 days and then it will be invalid, so don’t store it anywhere for long term use. Also, this does not work if the user is not logged into the Windows Store with their Microsoft account and you have no way to trigger a login yourself.
Oh by the way: You can only retrieve the collections ID of the user on your client with a valid Azure Active Directory token that we have created on your server in the previous step. And these are valid only short term, so don’t hardcode them. What?!
Summarized, these are the required steps to finish the transaction:
- After the purchase has completed on the client, ask your server for a valid collections token. (Not before, user might not be logged into their Microsoft account)
- With this token, retrieve user collections ID on the client.
- Send this collections ID back to your server. (Do not store it, it will invalidate)
- On your server, ask Microsoft servers for any unfulfilled purchases of the user.
- Issue the items to the user, for example add virtual currency in your database.
- Report purchases as fulfilled to Microsoft.
The code to retrieve the collections ID for the user in AS3 looks like this:
WindowsStore.service.getStoreId(token, yourUserID, "collections");This will trigger the events StoreIDEvent.GET_STOREID_COMPLETE or StoreIDEvent.GET_STOREID_ERROR. On success, you will be able to access event.storeID in the StoreIDEvent and send it to your server.
To execute correctly, this function requires your app to be published to the Microsoft Store! You can change the access level for the app so that only a selected group of people has access to the app and that it is not visible to other users, but it must be published, otherwise the collections ID will not be returned.
Server Side Example
Here is a small example how to use the collections ID to retrieve and fulfil the purchases for that user. First, we create a general function to call Microsoft servers with an authorization token (the one we created earlier):
private static function makeAuthorizedCall($url, $token, $data)
{
	$fields = json_encode($data);

	$headers = array(
		'Authorization: Bearer ' . $token,
		'Host: collections.mp.microsoft.com',
		'Content-Type: application/json',
		'Content-Length: ' . strlen($fields)
	);

	$ch = curl_init();

	curl_setopt( $ch, CURLOPT_URL, $url );
	curl_setopt( $ch, CURLOPT_HTTPHEADER, $headers);
	curl_setopt( $ch, CURLOPT_RETURNTRANSFER, true );

	curl_setopt( $ch, CURLOPT_POST,           1 );
	curl_setopt( $ch, CURLOPT_POSTFIELDS,     $fields);

	$result = curl_exec($ch);
	$http_code = curl_getinfo($ch, CURLINFO_HTTP_CODE);

	// Close connection
	curl_close($ch);

	return $result;
}
Now we can use this function to get all products of a user that have not yet been fulfilled. $uid in this case is the same userID we have used on the client side earlier when asking for the collections ID:
public static function getProducts($uid, $collectionsId, $token)
{
	$url = "https://collections.mp.microsoft.com/v6.0/collections/query";

	$userIdentity = array(
		'identityType' => 'b2b',
		'identityValue' => $collectionsId,
		'localTicketReference' => $uid
	);

	$data = array(
		'beneficiaries' => array($userIdentity),
		'productTypes' => array('UnmanagedConsumable'),
		'validityType' => 'Valid'

	);

	$response = self::makeAuthorizedCall($url, $token, $data);

	$result = json_decode($response, true);

	return $result;
}
You can parse the response and give the user access to all the products he bought. Here is a small example that iterates over the result set:
$items = WindowsStore::getProducts($uid, $collectionsId, $token);

foreach($items['items'] as $item)
{
	$winstoreProductId = $item['productId'];
	$transactionId = $item['transactionId'];

	error_log("$transactionId, $winstoreProductId");
}
The $winstoreProductId is the very same Store ID we have seen in the Windows Dev Center Dashboard earlier when we created the add-on. You can use it on your server to identify what exactly the user bought.
Once you have issued the item to the user, you need to tell Microsoft that you have fulfilled the contract:
public static function reportFulfilled($uid, $collectionsId, $winstoreProductId, $transactionId, $token)
{
	$url = "https://collections.mp.microsoft.com/v6.0/collections/consume";

	$userIdentity = array(
		'identityType' => 'b2b',
		'identityValue' => $collectionsId,
		'localTicketReference' => $uid
	);

$data = array(
		'beneficiary' => $userIdentity,
		'productId' => $winstoreProductId,
		'transactionId' => $transactionId

	);

	$response = self::makeAuthorizedCall($url, $token, $data);

	$result = json_decode($response, true);

	return $result;
}
And that’s it, you are done!
A final note: The $token we created will be invalidated after a short while (I believe it’s one hour). The best practice recommends to renew this token with a specific call, but it is also possible to just create a new token with the credentials like we did in the beginning. Just don’t take the shortcut to generate the token on your client, the credentials must remain secret. Don’t include them in your client!
Let me know if you face any issues with the process or in case I missed out important steps. Also let me know in case you published an app based on this blog, I would love to see it!
Good luck out there buddy.
hello
I need this project complet if you have one
thanks again
Hi, sorry I do not have a demo project available, but let me know if you have any specific questions about the guide and I will try to help.
hi rewb0rn
i am trying to make ane for windows store in-app purchase,but it seems difficult.do you know that if ane can import the win10 library file (*.winmd).thanks!
Hi Adam,
yeah the in-app purchases on Windows 10 have had me head-scratching a couple of times as well. Unfortunately we have not worked with *.winmd files, so I can not offer any help on this. Sorry!
Good luck
hi rewb0rn
so you pay for the Distriqt to make the ane?what is the price ?^-^
Hi Adam,
initially we paid Distriqt to develop this ANE for us. I do not know at what price they will sell the ANE now. You can contact them from their website https://airnativeextensions.com/
hi rewb0rn
thanks a lot .i try to contact them
This ANE is now available here:
https://airnativeextensions.com/extension/com.distriqt.WindowsStore
Microsoft says ‘Use the https://onestore.microsoft.com audience only with access tokens that are stored securely within your service. Exposing access tokens with this audience outside your service could make your service vulnerable to replay attacks.’
They say to use “https://onestore.microsoft.com/b2b/keys/create/collections” instead to send to the client and only use the one you specify on the server to make requests to the MS Store API. any thoughts?
Also, since these tokens last for 60 min I would want to cache them and only refresh them once an hour when they’ve expired, rather than requesting a new one every time. But you say to only fetch the token *after* the user has completed the purchase (which means generating a new access token for every user request and no reusing tokens). Is this really necessary?
I think if I understand you correctly that is already the case. We do not send the access token / credentials used to create tokens with Microsoft to the client. Only after we generated an access token for the “collections” group we send that one to the client. This should be safe. Anyway, can you send me the link for this part of the doc that you quoted so I could check it against our practice?
To your second question: Yes, we are storing the access token on the server and clients can receive a cached token. We only create a new one if the existing one is close to becoming invalid. I think we use a threshold of 5 or 10 minutes (or if it has has expired already)
I set up the app as described here and in the MS docs, but the requests for the access tokens return 404. There are a couple suggestions in comments in the docs and on stackoverflow about the app manifest but that didn’t help. any thoughts?
Creating the access token should be limited to the scope of Azure and not related to your (client) application manifest file. 404 sounds strange, though. Any chance you are using a GET request instead of POST?
Everytime I try to make an in app purchase in my game I’m getting a PEX-CatalogDataNotFound error. Could this be a problem with the settings I use for packaging? Not sure what else I should try.
To be more specific, the error is this:
PEX-CatalogAvailabilityDataNotFound
Seems like it can’t find the “add-on”, but I’ve double checked that the add on id matches the id in my client.
Hi, I have this same problem with my application. The distriqt core lib is already in my project. Did you have to do anything else to resolve this?
I have never seen the error myself so I am not sure I can help. Just double checking, did you also include the core lib in your application.xml file under extensions? Otherwise, it would not be packaged with your app.
Also keep in mind that you must convert your app to .appx before you can make any calls to the Store API. It will not work if you run ADL or the .exe file.
I’ve already done it in my project, but the error still occurs
Disregard this, I forgot to add the distriqt Core ane somehow, I’m dumb.
Glad you figured it out and thanks for sharing the solution here for others to find 🙂
Hi rewb0rn, thanks a lot for this tutorial.
I’m trying to get Store id with:
WindowsStore.service.getStoreId(token, yourUserID, “collections”);
here token is given by my server, but what is yourUserID? How can I get from my app?
Hi Greg,
“yourUserID” refers to an identifier that you have in your own system for the user, for example the database ID of the user, if you have a database.
If you don’t have a backend service, you should not require to get the Store Id of the user. You only need it to retrieve the purchases of the users on your servers. If you only have an app without a server side, you can skip this step.
Maybe share a bit more of what you are trying to do, then I can have a look.
Hi rewb0rn, thanks a lot for the details.