Part I: From Air to Windows Store
We have recently released our first game for Windows 10 on the Windows store, including in-app purchases. Since there are only few resources available how to convert an app to a Windows Universal Package (UWP), especially from an Air perspective, I want to share a step-by-step guide. This first part will cover the conversion of a generic Air app to the Windows store. The second part covers in-app purchases and is available here.
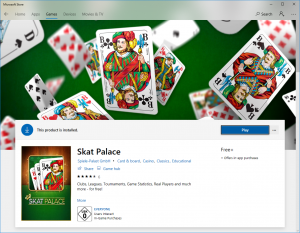
If you want to have a look first, here is a link to our game on the store:
Direct Link (only works on Windows 10)
Windows Store website
Prerequisites
To get your Air app live in the store, we will use the Microsoft Desktop App Converter that Microsoft has released to allow an easy conversion from Win32 applications to Windows Store appx packages. While it is a very convenient tool, a lot of steps are involved. Here is a quick overview of the requirements. Don’t worry, we will go through each of them in a moment:
Now take a deep breath, it’s time to get your hands dirty.
Preparing your app
When you think about releasing your app or game for the Windows store, you should already have a desktop version of your project ready. It is worth noting that you will have to publish the app as an .exe file, an Air package will not work. So make sure that your adt command uses the target bundle. This is what our adt call looks like:
adt -package -storetype pkcs12 -keystore “cert\desktop.p12” -storepass [PASSWORD] -target bundle air\install.air application.xml -C bin . -extdir “..\_extensions”
Note that the adt call references the Air configuration file “application.xml” that you should already have. Furthermore, we include -extdir “..\_extensions”. The extensions directory is only required for Adobe Native Extensions (ANEs) that you might not need at this point, so you could remove that part. However I will keep this for reference since we will need it in the future when adding Store payments.
With this call, adt should convert your app into a a standalone Windows project that should run when opening the .exe file.
Optional: Wrapping your app into an installer
If you already have an Air app for Windows that you offer to your customers, chances are that you also have an installer file that will setup your app or game on your clients’ computer. You can use this installer with the Desktop App Converter. Alternatively, we can directly target the Air output without using an installer file. More on this later.
We have chosen to work with Inno Setup but there are a number of free alternatives available. I have not tried other options, so the decision is really up to you.
The installer should include all files and subdirectories that are inside the “air/install.air” directory. Reserve some time for this step and test your installer carefully before you continue, ideally on systems that have never seen your project before. This will make it easier to spot errors before you scratch your head over why the Windows Store build does not work correctly. Make sure that all dependencies are correctly installed and also removed when uninstalled. Creating installers is not a no-brainer, so don’t expect this to be done in 5 minutes.
Prepare the Store entry
Now is a good time to create your app entry in the Windows Dev Center. This can also be done at a later time, but it will give you access to some info that is referenced in the conversion process if you want to release the build on the store. If you skip this step now, you can use debug info later in the process until you are ready.
When you are signed in, click Dashboard on top to access the Partner Center. If I remember correctly, this step involves some verification process by Microsoft, but it is so long ago that I don’t remember all the details. Feel free to comment on this so I can include it here.
Once you are ready and a verified partner, you should be able to create a new app. With the app entry created, find the “App management” tab and click “App identity”. This list includes some values that we can use for the conversion process.
The Conversion – Prepraration
The next step is to actually convert your app into a Universal Windows Platform (UWP) .appx package. Please note that despite the name, it will only work on Windows 10 for PC.
Before we can start, we need to install and setup the converter. Download the Desktop App Converter through the Microsoft store from here.
Next, download the correct image file from here that is needed to initialize the converter before you can use it. The image file version number should match your Windows build number that you find via Windows Settings -> System -> About -> OS build.
Now open the Windows search bar and find the “Windows App Converter”. Right click the entry and start the converter as an administrator. A console will open, enter the following commands:
1) Set-ExecutionPolicy bypass
2) DesktopAppConverter.exe -Setup -BaseImage .\BaseImage-1XXXX.wim -Verbose
This might involve a system restart. If you require additional help, the official Microsoft documentation that this part of the blog is based on can be found here.
Your converter installation should now be ready for use.
The Conversion – Execution
Conversion time, finally! Before we start, I would like to give some folder structure recommendations as follows.
Create a new folder on your hard drive where you plan to keep your conversion files in. In this folder, create a readme.txt file where you can paste all the handy commands that we will use, since you will need them every time you create a new version. Also in that directory, create a folder called “builds” that will contain the converted app or apps. Using this subfolder will allow you to exclude it from git to save bandwidth.
Depending on whether you have an installer for your Air application or not, one of the two option applies. In both cases, make sure you are running the Desktop App Converter as an admin, then paste the commands into the console window.
1) Convert without installer
DesktopAppConverter.exe -Installer "[PATH_TO_FOLDER]" -AppExecutable [FILENAME.EXE] -Destination [TARGET_PATH\builds] -PackageName "[Package/Identity/Name from App Identity (see above)]" -PackageDisplayName "[YOUR_APP_NAME]" -AppId "[APP_ID]" -PackageArch "x86" -Publisher "CN=[Package/Identity/Publisher from App Identity (see above)]" -PackagePublisherDisplayName "[Package/Properties/PublisherDisplayName from App Identity (see above)]" -AppDisplayName "[YOUR_APP_NAME]" -Version 1.0.0.0 -MakeAppx -Sign -Verbose
2) Convert with installer
DesktopAppConverter.exe -Installer "[PATH_TO_INSTALLER_FILE]" -InstallerArguments "[ARGUMENTS]" -Destination [TARGET_PATH\builds] -PackageName "[Package/Identity/Name from App Identity (see above)]" -PackageDisplayName "[YOUR_APP_NAME]" -AppId "[APP_ID]" -AppDisplayName [YOUR_APP_NAME]" -PackageArch "x86" -PackagePublisherDisplayName "[Package/Properties/PublisherDisplayName from App Identity (see above)]" -Publisher "CN=[Package/Identity/Publisher from App Identity (see above)]" -Version 1.0.0.0 -MakeAppx -Sign -Verbose
For the three values that reference the App Identity from the Windows Dev Center Dasboard of your app, you can use some default values until you plan to ship the product. For example -PackageName "My Great Game" -PackagePublisherDisplayName "Best Company".
-PackageArch "x86" is required in our case, but might differ if you build an Air app with 64 bits support.
The directive -InstallerArguments "[ARGUMENTS]" depends on whether your installer needs arguments to run in silent mode. In our case we use -InstallerArguments "/SILENT /LOG=[SOME_LOG_PATH].txt"but maybe you can skip it altogether.
The first time that you run this command the converter will make sure that all required settings are activated. There is a virtualization feature that needs to be turned on and there is a chance that your computer does not even support it. At least in our case one of our machines could not run the converter and we had to use a different system.
Anyhow, if that problem is solved and your system has been restarted potentially a couple of times, you should now find an .appx file in your [TARGET_PATH\builds\PACKAGE_NAME] directory.
Testing the appx package
The converter automatically created a subfolder in the builds directory with the Package Name of your app. In this folder you find the .appx file along with a certificate and other resources. Unfortunately you will have to install the certificate every single time you want to test a new version of the .appx.
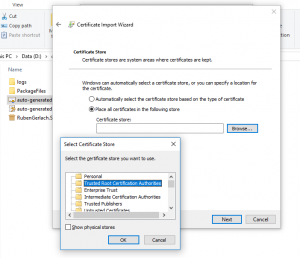
Double click the auto-generated.cer file. Then click “Install certificate”. Next choose “Local Machine” and confirm administrator access. Next choose “Place all certificates in the following store” and click “Browse”. Here choose “Trusted Root Certification Authorities” and click “OK” and then “Next”, then “Finish”. It’s no joke, you have to do this every single time you create a new version and want to test it. If you don’t, Windows will not allow you to install your .appx package.
Now you can double click the .appx file and Install your app on the system. In subsequent conversions you need to uninstall the existing version of the .appx first. Do this by searching your app in the Windows 10 search bar, then right click and Uninstall it. Only then the new version can be installed, otherwise it will just offer you the option to start the already installed version.
Optional: Faster iterations with your own certificate
If you happen to own a code signing certificate already, or you feel installing the certificate 50 times a day is worth buying one, you can skip the manual installation of the auto generated certificate by using a proper certificate from a verified authority. Please note that this only works during development and that you can not ship the .appx to Microsoft with a custom code signing certificate.
To do this, remove the -Sign directive from the conversion command and instead sign the .appx file yourself with signtool.exe which is part of the Windows 10 SDK and can be found under Windows Kits\10\bin\[version]\x64:
signtool.exe sign -f [PATH_TO_CERT.p12] -p [PASSWORD] -fd SHA256 -v [PATH_TO_APP].appx
Note that signtool will make sure that .appx publisher field and certificate publisher match. A day long story short, alter your -Publisher "CN=[Package/Identity/Publisher]directive from the converter command to match the info that you find out by using this OpenSSL command:
openssl pkcs12 -nokeys -in [PATH_TO_CERT.p12] -passin pass:[PASSWORD]
If this doesn’t work at all you can find signing debug error logging like so: In the Windows Search bar, run “Eventvwr.msc”. Open the event log: Event Viewer (Local) > Applications and Services Logs > Microsoft > Windows > AppxPackagingOM > Microsoft-Windows-AppxPackaging/Operational
Magic!
Polishing Icons
The .appx that you have now should technically be ready to be released on the Store. However, the icon assets that the converter produces look really bad. Don’t you worry, I got you covered.
If you haven’t, yet, it is time to install Visual Studio from here.
Now a couple of head scratches later, you should find the Visual Studio entry in the Windows 10 Start menu. Don’t open the executable, instead open the Visual Studio subfolder. Inside there should be the “Developer Command Prompt”. Run it to find another console window.
We will now unpack the .appx package and fiddle with its contents. To create the extracted version of the package, run this command in the Visual Studio console:
makeappx unpack /v /p [PATH_TO_UWP].appx /d [TARGET_PATH\builds\APPNAME-Unpacked]
If that was successful, you will find a new folder in the builds directory that includes all files that were contained in the .appx. Go inside and into the Assets folder. It contains a number of images that all look very blurry. Go back and copy the Assets folder as a whole. Then navigate to the root of your conversion folder and create a new folder called “_assets-[APPNAME]” next to the “builds” folder and paste the Assets folder inside. We will later store more files than just the Assets subfolder inside it, so don’t just copy the Assets folder next to builds.
It is now time to replace the contents of all the .png files in the “_assets-[APPNAME]\Assets” folder with your high quality custom icons. Of course make sure that you do not accidentally change the dimensions of any of the images. This process will take a while and that is why we store a copy of the polished icons outside of the builds folder, so we can copy it quickly next time you release an update.
In the past, Microsoft did not allow icons over a certain file size and this size limit was easily triggered. So in case that happens to you, Adobe Photoshop has a nice feature to save PNG files with 8 bits by preserving highest quality of content. But I haven’t seen the error with recent updates of the converter even without compression.
When you are done, copy the “_assets-[APPNAME]\Assets” folder into the unpacked .appx folder and override the blurry icons.
Now you can recreate the .appx package with the updated assets by executing this command in the Visual Studio prompt:
makeappx pack /p [PATH_TO_UWP.appx] /l /d [TARGET_PATH\builds\APPNAME-Unpacked]
Confirm to overwrite the existing .appx file and find the updated package in the builds folder.
Optional: Creating a multi language package
Unfortunately, the Desktop App Converter creates English only packages by default. Here is a small guide to convert your app into a multi-language application.
Navigate to the _assets-[APPNAME] folder and create a new folder called “Strings” next to the existing “Assets” folder that you put there in the previous step. In the Strings folder, create new folders for each language you want to create by using the ISO-Standard in lower case. In our case that means “en-us” and “de-de”.
Inside each of the language folders now create a new file called “resources.resw”. Despite the ending, this will be an XML file with the following content, localized for the specific language:
<?xml version="1.0" encoding="utf-8"?>
<root>
<data name="ApplicationDescription">
<value>Your description</value>
</data>
<data name="ApplicationDisplayName">
<value>Your App Name</value>
</data>
<data name="PackageDisplayName">
<value>Your App Name</value>
</data>
<data name="PublisherDisplayName">
<value>Company Name</value>
</data>
<data name="TileShortName">
<value>Your App Name on the Tile</value>
</data>
</root>
Again, we are storing the Strings folder for reference here. Now copy it into the unpacked folder of your .appx where you also copied the Assets folder.
Next we need to reference the translations in the project. In the unpacked project folder, find the manifest file called “AppxManifest.xml” and open it. Here we need to replace the hard coded strings with variables that reference above language files.
<DisplayName>ms-resource:Resources/PackageDisplayName</DisplayName>
<PublisherDisplayName>ms-resource:Resources/PublisherDisplayName</PublisherDisplayName>
<uap:VisualElements DisplayName="ms-resource:Resources/ApplicationDisplayName" Description="ms-resource:Resources/ApplicationDescription" [... keep the rest of the arguments as they are]>
<uap:DefaultTile ShortName="ms-resource:Resources/TileShortName" [... keep the rest of the arguments as they are]>
In the <Resources>node, add an entry for each language you support just above the scaling entries like so:
<Resource Language="en-us" />

<Resource Language="de-de" />

<Resource uap:Scale=...
Save your changes and copy the file into your assets directory, next to Assets and Strings for future reference. Notice that when you copy the manifest file over the converted one, this will override the version number, so you have to change it manually each time, because the Store will not allow you to upload the same version number twice.
One final step is required to make multi language work, because the new String resources are not yet registered in the project. We now need to create a new .pri file that organizes the project resources based on the resources of the unpacked app.
Open the Visual Studio Developer Command Prompt again and cd into the unpacked .appx directory. Then execute these commands from there:
Notice how all supported languages are separated with an underscore:
1) makepri createconfig /cf ..\[APPNAME].xml /dq en-US_de-DE /pv 10.0 /o
2) makepri new /pr . /cf ..\[APPNAME].xml /of ..\resources.pri /mf AppX /o
Verify results:
makepri dump /if ..\resources.pri /of ..\resources /o
Navigate one level up into the builds folder and you should find a number of files, including the desired resources.pri file. Delete the other files that are no longer needed and copy the resources.pri into the unpacked .appx folder as well as into the assets folder next to the AppManifest.xml for future reference.
Now you can create the .appx package again, including the multi language changes, like before:
makeappx pack /p [PATH_TO_UWP.appx] /l /d [TARGET_PATH\builds\APPNAME-Unpacked]
Shipping to the Windows Store
The .appx you have at your hands now should be good for release. Navigate to the Windows Dev Center Dashboard and select the app you have created earlier. Next, start a new submission, if you haven’t already. A submission is basically a version of your app, including it’s presence on the store.
In this submission, navigate to packages and drag and drop your .appx file into the upload field. Uploading the .appx will check for various errors, for example Publisher name, Package name, asset file sizes and so on. So expect some problems and dedicate some time to fix them the first time you do this.
Before you can release the app to production, Microsoft will ask you to send them a small report about your app. This will include results from the “Windows app cert kit” that is included in the Windows 10 SDK and answering some questions about your product. This step will take up a couple of days, so plan ahead.
Once all of that is done you should be able to finalize your Windows Store presence, including description, screenshots and so on. Hit the “Submit to the Store” when everything is ready. From here it should only take a couple of days until your app is live and available for users on the store.
Updating
Whenever you want to release a new version of your app, you can skip some of the previous steps that only need to be taken once. Here is a short little overview of your update loop:
- Update your Air build and installer (if any)
- Convert Air build / installer with the Desktop App Converter to .appx
- Unpack .appx with Visual Studio Command Prompt
- Replace contents in unpacked folder with your files (Assets , and if multi-language: Strings, AppxManifest.xml and resources.pri)
- If multi-language: Edit AppxManifest.xml to set new version number
- Package .appx with Visual Studio Command Prompt from the unpacked folder
- Upload .appx to Windows Dev Center and submit to Store
It is worth noting that Microsoft will not allow remote updates from within the .appx application by downloading swf files from a server, even though it is technically possible to do that. Our app was rejected for this reason when it showed an update mechanic. That means the only way to provide a new version to your users is by submitting a new .appx through the store.
Conclusion
I hope this guide is useful for anyone interested in deploying Air for Windows Store. If you think this was complex, wait until we have a look at in-app purchasing in Part II.
In any case let me know if you face any problems during the process, if something is unclear or if I missed to cover important aspects. If you worked through the guide and have released something, please post a link here so I and other Air devs can check it out, I am always curious to see what other people work on.
Happy coding!